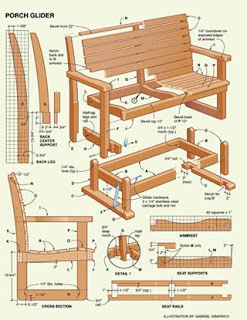
Soar into Comfort: DIY Glider Chair Projects for Every Room
Building your own glider chair is a rewarding project that yields a beautiful and functional piece for any space. Whether you envision a calming nursery rocker, a relaxing patio lounger, or a stylish living room addition, this guide provides detailed plans and inspiration to get you started. Forget expensive store-bought options; unleash your creativity and craft a custom glider that perfectly matches your style and needs. You'll be surprised by how achievable this project is with the right instructions and a little elbow grease.
Choosing Your Glider Style and Materials
Before you dive into the tools, consider the overall aesthetic you desire. A rustic farmhouse glider might feature reclaimed wood and simple lines, whereas a modern glider could incorporate sleek metal accents and vibrant fabrics. For a nursery, prioritize soft, durable fabrics and a sturdy, lightweight frame. Outdoor gliders demand weather-resistant materials like pressure-treated lumber or marine-grade plywood. Your living room glider allows for more creative freedom in material selection â€" explore different types of wood, upholstery, and finishes to match your existing décor. Careful planning at this stage significantly impacts the final product.
Essential Materials: A Comprehensive List
The materials you'll need vary depending on your design, but generally include:
- Wood: Pine, cedar, or hardwood depending on your chosen style and durability requirements.
- Hardware: Screws, bolts, hinges, gliding mechanisms (these are crucial for the rocking motion!), and potentially caster wheels for added mobility.
- Fabric/Upholstery: Choose a material suitable for its intended location â€" durable outdoor fabrics for patios, soft and washable fabrics for nurseries, and stylish options for living rooms.
- Foam padding: For added comfort and support in your seat and back cushions.
- Finishing supplies: Stain, paint, varnish, or sealant, depending on your chosen wood and aesthetic.
Step-by-Step Construction Guide: A Simple Glider
This guide outlines a basic glider chair design, perfect for beginners. More complex designs will require more advanced woodworking skills and potentially specialized tools. Always prioritize safety and wear appropriate protective gear.
Building the Frame: Precision and Stability are Key
Begin by cutting the wood pieces to your desired dimensions according to a pre-drawn plan. Accurate measurements are essential for a stable and functional glider. Assemble the frame using screws and wood glue, ensuring all joints are tight and secure. Consider using wood dowels for extra strength. Remember, the frame’s stability directly influences the glider's rocking motion and overall comfort. Take your time and double-check your measurements at each stage.
Incorporating the Gliding Mechanism: Smooth Sailing Ahead
This is where the magic happens. Carefully attach the gliding mechanism to the base of the frame according to the manufacturer's instructions. This mechanism is responsible for the smooth rocking motion, so precise installation is crucial. You may need to drill pilot holes before attaching the mechanism to prevent the wood from splitting. Test the gliding motion frequently during assembly to ensure smooth and safe operation.
Adding Cushions and Upholstery: Comfort and Style Combined
Once the frame is complete, cut and sew your fabric covers for the seat and back cushions. Ensure the fabric is taut and neatly finished. Fill the cushions with foam padding for optimal comfort. Attach the cushions to the frame using appropriate fasteners, ensuring they fit snugly and securely. This step allows you to personalize your glider with your favourite fabrics and patterns.
Finishing Touches and Safety Considerations
Once your glider is assembled, apply your chosen finish (stain, paint, or varnish) to protect the wood and enhance its appearance. Let it dry completely before using the chair. Regularly inspect the glider for any signs of wear and tear, particularly the gliding mechanism and fasteners. Always supervise children using the glider and ensure it's stable and secure.
Building your own glider chair is a rewarding experience. The sense of accomplishment is unmatched, and you'll enjoy a truly unique piece tailored to your needs and style. So, gather your tools, choose your materials, and embark on this exciting DIY adventure!


0 comments:
Post a Comment