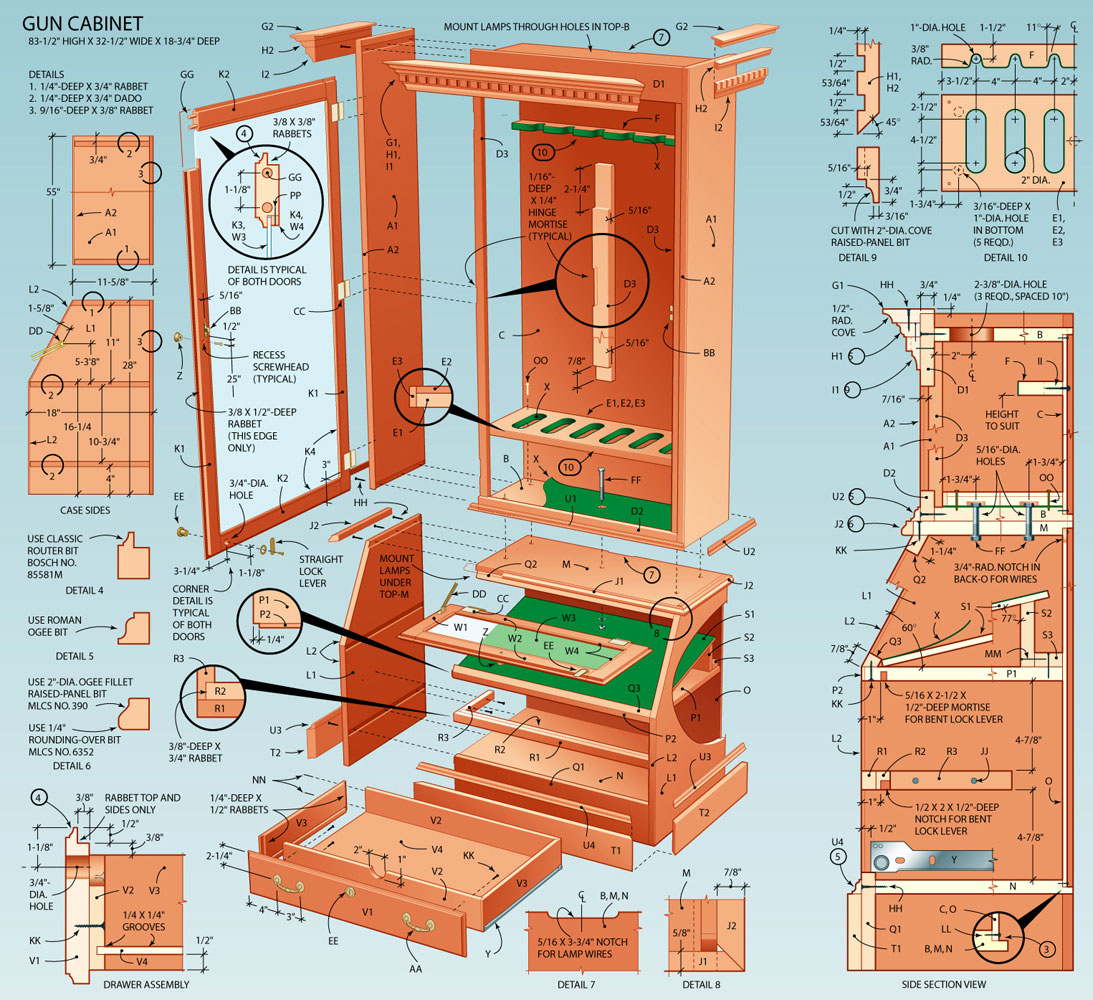
Owning firearms necessitates responsible storage, ensuring both safety and security. While pre-made gun cabinets offer convenience, crafting a handmade cabinet provides the satisfaction of a personalized solution tailored to your specific needs and aesthetic preferences. This guide outlines the process of building a secure and customizable gun cabinet with adjustable shelves, empowering you to create a functional and visually appealing storage solution for your firearms.
1. Planning and Design:
a. Cabinet Dimensions and Configuration:
- Begin by determining the desired dimensions of your cabinet based on your firearm collection. Consider the length, width, and height necessary to accommodate your firearms while allowing for comfortable access.
- Decide on the number of shelves required and their placement. You can opt for fixed shelves for specific firearms or incorporate adjustable shelves for greater versatility.
- Sketch a detailed diagram of your proposed cabinet design, including shelf locations, door configuration (single or double), and any additional features like drawers or compartments.
b. Material Selection:
- Wood: For a traditional look, choose solid hardwood like oak, cherry, or maple, known for their durability and natural beauty. Consider using plywood for cost-effectiveness and stability.
- Metal: Steel or aluminum offers exceptional strength and security. Metal cabinets can be readily customized with various finishes.
c. Security Features:
- Lock and Hinges: Select high-quality, tamper-resistant locks and hinges to deter unauthorized access. Explore options like biometric locks or keyed locks with multiple deadbolts.
- Cabinet Construction: Use sturdy construction techniques, including dovetail joints or mortise-and-tenon joints, for increased strength and stability.
- Interior Features: Consider incorporating features like padded shelves for firearm protection, magnetic strips for securing tools, and integrated cable management systems.
2. Building the Cabinet Structure:
a. Cutting and Assembling the Framework:
- Use precise measurements to cut the wood or metal components according to your design.
- Employ a miter saw or table saw for accurate cuts, ensuring square corners and smooth edges.
- Join the cabinet sides, top, and bottom using robust joinery techniques like mortise-and-tenon, dovetail, or pocket hole joints. Secure the joints with glue and screws.
b. Constructing the Shelves:
- Cut the shelf boards to the desired dimensions and ensure they fit snugly within the cabinet framework.
- If utilizing adjustable shelves, create a system for shelf support. Common options include:
- Metal Shelf Supports: These pre-made brackets offer adjustable height and easy installation.
- Dadoed Shelves: Cut grooves (dados) into the cabinet sides to create a secure channel for the shelves to slide in and out.
- Dowel Pins: Drill holes into the cabinet sides and shelf boards and use dowel pins to create adjustable shelf positions.
3. Finishing and Detailing:
a. Sanding and Finishing:
- Thoroughly sand the wood cabinet using progressively finer grit sandpaper to achieve a smooth finish.
- Apply wood stain or paint according to your aesthetic preferences. Multiple coats are recommended for a durable and aesthetically pleasing finish.
- Seal the wood with a clear polyurethane coating to protect it from moisture and wear.
b. Installing Hardware:
- Mount the door hinges to the cabinet door and the corresponding frame. Adjust the hinges for proper alignment and smooth door operation.
- Install the door handles, lock, and any additional hardware components. Ensure they function correctly and are securely fastened.
c. Interior Accessories:
- Install the shelves according to your design and ensure they are securely attached.
- If using adjustable shelves, verify their smooth operation and ability to hold the weight of your firearms.
- Add any additional interior accessories like padded shelves, magnetic strips, or cable management systems.
4. Finishing Touches and Customization:
a. Personalization:
- Enhance your cabinet's functionality with custom features like a built-in gun cleaning station, a compartment for storing ammunition, or a dedicated space for optics.
- Add decorative elements such as engraved plaques, metal accents, or custom paint detailing to personalize your cabinet.
b. Secure Installation:
- Choose a suitable location for your cabinet, considering factors like accessibility, visibility, and security.
- Mount the cabinet securely to the wall or floor using heavy-duty anchors or brackets to prevent theft or accidental tipping.
- Consider using a security system or motion detectors for additional peace of mind.
5. Safety and Maintenance:
a. Safe Handling:
- Always handle firearms responsibly and store them in a secure and accessible manner.
- Keep firearms unloaded and separate from ammunition when not in use.
- Store ammunition in a separate locked container within the cabinet.
b. Regular Maintenance:
- Periodically inspect the cabinet for signs of wear or damage. Tighten loose screws and replace any faulty hardware.
- Keep the cabinet clean and dust-free to ensure proper function and longevity.
Conclusion:
Crafting a handmade gun cabinet allows you to create a secure and personalized storage solution for your firearms. By following this guide, you can construct a cabinet that meets your specific needs and aesthetic preferences, ensuring the safe and secure storage of your firearms. Remember to prioritize safety and security throughout the entire process and to maintain your cabinet regularly for optimal functionality and longevity.
Saturday, November 9, 2024
How to make a handmade gun cabinet with adjustable shelves for storage
How to make a wooden gun box with a simple, secure design

A well-constructed gun box is a crucial element of responsible firearm ownership. It provides essential protection for your firearms, ensuring their safety and security. While commercially available gun boxes abound, building your own offers a sense of accomplishment and allows for customization to meet your specific needs. This guide will walk you through the process of crafting a secure and simple wooden gun box, prioritizing functionality and ease of construction.
Materials:
Wood: Choose a sturdy hardwood like oak, walnut, or maple for the main body of the box. Pine or plywood can be used for internal components.
Hinges: Heavy-duty hinges designed for wooden boxes. Consider using three or four hinges for added strength.
Lock: A sturdy, high-quality lock with a key or combination mechanism.
Hardware: Screws, nails, wood glue, finishing nails, wood filler, and stain or paint of your choice.
Tools: Circular saw, jigsaw, drill, screwdriver, sander, measuring tape, pencil, hammer, and clamps.
Design Considerations:
1. Size: Determine the dimensions of the box based on the firearms you intend to store. Allow for ample space around the guns for cushioning and prevent movement.
2. Security: Choose a lock that meets your security requirements. Consider a lock with multiple locking points or a combination lock for added protection.
3. Internal Organization: Decide on the layout of the interior. You may want to include compartments for magazines, cleaning supplies, or other accessories.
4. Aesthetics: Choose a design that complements your preferences and blends seamlessly with your storage environment.
Construction:
1. Cutting the Pieces:
Cut the base, lid, and sides of the box according to your chosen dimensions.
Cut the internal components if you plan on including compartments or shelves.
2. Assembly:
Assemble the sides to the base using wood glue and screws. Clamp the pieces firmly together until the glue sets.
Attach the lid using the heavy-duty hinges. Ensure the hinges are positioned securely and allow for smooth opening and closing.
Install the lock mechanism on the lid and the corresponding strike plate on the box.
3. Interior Features:
If you're adding compartments or shelves, attach them securely to the box using glue and screws.
Consider lining the interior with soft materials like felt or foam to protect the firearms from scratches and dings.
4. Finishing:
Sand all surfaces to a smooth finish. Fill any imperfections with wood filler.
Apply stain or paint according to your preference, ensuring a durable and attractive finish.
Safety and Security Measures:
Secure Storage: Store the gun box in a locked location, away from children and unauthorized individuals.
Lock Mechanism: Regularly inspect the lock to ensure it functions properly.
Firearms Handling: Always practice safe firearms handling procedures when accessing and using the guns.
Maintenance: Regularly inspect the box for signs of wear or damage. Repair or replace components as needed.
Enhancements and Customization:
Hidden Compartments: Consider adding hidden compartments for additional storage or to conceal valuable items.
Custom Design: Incorporate decorative elements like wood carvings, inlays, or metal accents to personalize the box.
Weatherproofing: If storing your guns outdoors, consider weatherproofing the box with a sealant or paint.
Integrated Foam: Use pre-cut foam inserts to secure the firearms in place and prevent movement.
Conclusion:
Building a secure and simple wooden gun box is a rewarding project that combines craftsmanship with responsible firearm ownership. By following these steps, you can create a custom storage solution that meets your specific needs and protects your valuable firearms. Remember to prioritize safety and security in all aspects of the design and usage of your gun box.
Diy guide to creating a wooden gun cabinet for small collections

Owning firearms comes with a responsibility to store them securely, and a dedicated gun cabinet is the gold standard for responsible storage. While pre-made cabinets offer convenience, crafting your own wooden gun cabinet allows for a personalized touch and the satisfaction of a hand-built creation. This guide will walk you through the process of constructing a sturdy and aesthetically pleasing gun cabinet, ideal for smaller collections.
1. Planning and Design:
a) Size and Configuration:
Begin by determining the size of your collection and the dimensions of the firearms you intend to store.
Consider the length, width, and height of the largest firearm, and add a few inches for padding and maneuverability.
Decide on the number of shelves or compartments needed. For a small collection, one or two shelves might suffice.
Draw a detailed sketch of your proposed cabinet, including measurements, shelf placement, and any desired decorative elements.
b) Material Selection:
Wood Type: Select sturdy hardwoods like oak, maple, or walnut for durability and aesthetics. Pine or plywood are budget-friendly alternatives.
Thickness: Aim for at least ¾" thickness for the sides, top, bottom, and shelves to provide structural integrity.
Hardware: Choose hinges, locksets, and drawer slides that complement the overall design and meet your security needs. Consider a heavy-duty lock with a keyed mechanism.
2. Tools and Materials:
Power Tools: A table saw, circular saw, drill press, jigsaw, and sander are essential for precise cuts and finishing.
Hand Tools: Hammers, chisels, screwdrivers, clamps, levels, tape measure, and a pencil will be needed for assembly and finishing.
Woodworking Supplies: Glue, wood screws, nails, wood filler, wood stain or paint, and protective finish (varnish, polyurethane) will be required.
Safety Gear: Safety glasses, ear protection, and a dust mask are essential during woodworking.
3. Building the Cabinet Frame:
Cutting the Sides and Top/Bottom: Using your table saw or circular saw, accurately cut the sides, top, and bottom panels to your desired dimensions.
Creating Rabbets: If desired, cut rabbets (recessed grooves) along the inside edges of the sides to create a secure and flush fit for the shelves.
Assembling the Frame: Using wood glue and screws, securely attach the sides, top, and bottom, creating a rectangular frame.
Adding Shelves: Cut the shelf boards to size and glue and screw them into the rabbets or place them on supports inside the cabinet.
4. Adding Doors and Locksets:
Door Cutting: Measure and cut the door panels from your chosen wood. For a simple design, two single doors are suitable. For a more elaborate design, you could create a single door with multiple panels.
Creating Mortises and Tenons: If desired, use a chisel to create mortises (rectangular recesses) in the door stiles (vertical pieces) and matching tenons (projections) on the door rails (horizontal pieces) for a classic joinery technique.
Installing Hinges: Install hinges on the doors and the cabinet frame. Consider heavy-duty hinges for added strength.
Installing Lockset: Drill the necessary holes and install the chosen lockset on one of the doors. Ensure the latch aligns correctly with the strike plate on the cabinet frame.
5. Finishing Touches:
Sanding: Sand all surfaces with increasing grit levels to remove imperfections and create a smooth finish.
Filling Gaps: Use wood filler to fill any gaps or imperfections in the wood.
Staining or Painting: Apply your chosen stain or paint, ensuring even coverage and allowing for drying time.
Sealing: Apply a protective finish like varnish or polyurethane to enhance the beauty and durability of the wood.
6. Additional Features and Tips:
Drawer: Consider adding a small drawer to the bottom of the cabinet for storing cleaning supplies or other accessories.
Padding: Line the shelves with felt or foam padding to prevent scratches on your firearms.
Lighting: Install a small LED light inside the cabinet for easy access.
Ventilation: Ensure proper ventilation within the cabinet to prevent moisture buildup.
Safety Features: Consider adding a safety feature such as a firearm cable lock to the cabinet.
7. Safety Considerations:
Always Wear Safety Gear: Protect yourself from potential hazards by wearing safety glasses, ear protection, and a dust mask.
Proper Tool Use: Use tools correctly and be aware of potential kickbacks or injuries.
Fire Safety: Be mindful of fire hazards when using power tools and applying finishes.
Storage and Handling: Store firearms responsibly and always handle them with caution.
8. Conclusion:
Building a wooden gun cabinet is a rewarding project that combines woodworking skills with responsible gun ownership. With careful planning, attention to detail, and a commitment to safety, you can create a durable and aesthetically pleasing cabinet that will protect your firearms for years to come. Remember, the final design and construction are limited only by your creativity and skill level. So, take your time, enjoy the process, and be proud of your hand-built masterpiece.
Friday, November 8, 2024
How to make a mid-century modern wooden desk for your home

The allure of mid-century modern design lies in its timeless elegance and functional simplicity. A mid-century modern wooden desk, with its clean lines, organic forms, and emphasis on natural materials, can become a centerpiece in any home office, study, or creative space. This guide will delve into the process of crafting such a desk, from initial design to final finishing, empowering you to create a piece that reflects your individual style and functional needs.
1. Design and Planning:
Inspiration and Research: Begin by exploring the world of mid-century modern furniture design. Study iconic pieces by renowned designers like Eames, Saarinen, and Noguchi. Examine their use of wood, material choices, and signature design elements, such as tapered legs, cantilevered shelves, and geometric shapes.
Defining Functionality and Style: Consider the specific functions you intend for your desk. Will it be used for writing, drawing, computer work, or a combination of these? Determine the necessary size and layout, including drawer space, shelves, and workspace.
Sketching and Material Selection: Sketch different design concepts, playing with proportions, shapes, and material combinations. Choose wood species based on their aesthetic appeal, durability, and availability. Popular mid-century modern choices include walnut, teak, and cherry.
Creating a Detailed Plan: Once you have a clear design in mind, create a detailed plan with precise measurements, material lists, and step-by-step instructions. This will serve as your blueprint throughout the construction process.
2. Cutting and Assembling the Desk Frame:
Preparing the Wood: Purchase high-quality wood planks in the desired dimensions. Ensure the wood is properly dried and planed for smooth surfaces.
Cutting the Pieces: Use a table saw or circular saw to cut the planks to the precise lengths and angles specified in your plan. Pay close attention to accuracy, as any discrepancies will affect the final structure.
Joints and Fasteners: Consider using traditional joinery techniques like mortise and tenon, dovetails, or pocket holes for strong, durable joints. For a more modern aesthetic, utilize metal brackets, L-brackets, or concealed fasteners.
Constructing the Frame: Begin assembling the frame, starting with the top, sides, and legs. Use wood glue and clamps to secure the joints. Ensure the frame is square and level throughout the assembly process.
3. Adding Features and Finishing Touches:
Drawer Construction: If your design includes drawers, create the drawer boxes using the same precision and techniques as the frame. Install drawer slides for smooth operation.
Shelving and Storage: Construct any shelves or other storage elements according to your plan, paying attention to weight distribution and stability.
Finishing Touches: Incorporate any desired decorative elements, such as metal accents, fabric inserts, or unique hardware.
4. Sanding and Finishing:
Sanding: Sand the entire desk, starting with coarse grit sandpaper and gradually moving to finer grades. Smooth out all rough edges and imperfections. Pay special attention to achieving a consistent finish, particularly in the areas where different pieces join.
Finishing: Select a finish that complements the wood species and desired aesthetic. Options include oil-based finishes, water-based polyurethanes, or waxes. Apply multiple coats according to the manufacturer's instructions, allowing sufficient drying time between coats.
5. Final Assembly and Installation:
Final Assembly: Once the finish has cured completely, assemble the remaining components, including drawers, shelves, and any additional features.
Installation: Place the desk in its desired location and make any necessary adjustments to ensure stability and levelness.
Tips for Success:
Invest in Quality Tools: Use precision tools, such as a table saw, miter saw, and drill press, for accurate cutting and assembly.
Practice Safe Workmanship: Always wear safety glasses and ear protection when using power tools. Use clamps to ensure secure joints and prevent movement during assembly.
Seek Professional Help: If you lack experience in woodworking or specific techniques, consider seeking guidance from a professional woodworker.
Conclusion:
Creating a mid-century modern wooden desk is a rewarding endeavor that allows you to express your personal style and create a unique piece for your home. By carefully planning, selecting quality materials, and executing each step with precision, you can craft a desk that exudes elegance, functionality, and the enduring appeal of mid-century modern design. This desk will not only serve as a practical workspace but also become a cherished heirloom, a testament to your craftsmanship and a piece that reflects your appreciation for the timeless beauty of classic design.
Diy wooden clock with easy step-by-step plans

Hey there, crafty friend! Ever wanted to add a touch of rustic charm to your home? Or maybe you just want to flex those DIY muscles and impress everyone with your handiwork? Well, get ready to grab your tools and unleash your inner woodworker because today, we're building a DIY wooden clock!
Don't worry, you don't need to be a master craftsman to pull this off. We're keeping it simple and straightforward, with steps that even a beginner can handle. So, put on your favorite playlist, gather your materials, and let's get started on this fun and rewarding project!
### The Supplies You'll Need
Before you dive in, let's make sure you've got everything you need. Here's your shopping list:
Wood: Choose your favorite! We'll be using a circular piece of wood for the clock face, so think about the size you want. A good starting point is a 12-inch diameter. You'll also need a smaller piece of wood for the clock hands. Pine, oak, or maple are all great choices for a classic look.
Clock Movement Kit: This is the heart of your clock. You can usually find these at craft stores or online. Make sure you get one that's appropriate for the size of your clock face.
Sandpaper: You'll need different grits to smooth out your wood, starting with a coarse grit (80-120) and finishing with a fine grit (220-400).
Wood Stain or Paint: This is for adding color and personality to your clock. Choose a stain that complements your home décor or go bold with a vibrant paint color.
Wood Glue: For securely attaching the clock hands and any other decorative elements.
Clear Coat: To protect your clock from spills and scratches, apply a couple of layers of polyurethane or varnish.
Drill and Drill Bits: You'll need a drill to make holes for the clock hands and the clock movement.
Screwdriver: For securing the clock movement.
Pencil: For marking your wood and planning your design.
Ruler: For measuring and ensuring accurate cuts.
Saw: A circular saw or jigsaw will help you cut the wood to the desired size and shape.
Safety Glasses and Gloves: It's always wise to protect yourself while working with tools and wood.
### Step-by-Step: Clock-Making Magic
Alright, let's get down to business!
1. Cutting the Clock Face
First things first, cut your wood into a circle. If you're using a circular saw, measure the diameter you want and carefully cut it out. If you're using a jigsaw, you'll need to draw a circle on your wood using a compass or a pencil and a string. Then, carefully cut along the line.
2. Sanding and Smoothing
Once your circle is cut, it's time to sand it smooth. Start with the coarse sandpaper to remove any rough edges and work your way up to the fine grit sandpaper for a silky smooth finish. You want your clock face to be perfectly smooth, ready for the next step.
3. Adding Color and Flair
This is where you get to let your creative juices flow! Do you want a natural wood look? Then go for a clear coat or a light stain. Craving a pop of color? Pick your favorite paint and give your clock face a bright new look. Remember, it's your creation, so let your personality shine through!
4. Marking and Drilling
Now, it's time to prep for your clock movement. Locate the center of your clock face and use a pencil to mark it. You'll also need to make a small hole in the center for the clock movement's shaft. Take your time and make sure the hole is just the right size.
5. Assembling the Clock Movement
Time to install the heart of your clock! Attach the clock movement to the back of your clock face. This usually involves screwing the movement into place. Double check the instructions that came with your kit, as the process can vary slightly depending on the model.
6. Making the Clock Hands
Let's craft some stylish hands! You can use the small piece of wood we talked about earlier or even find some decorative metal hands at your local craft store. If you're making them yourself, use a pencil to mark the desired length for your hands. You can also use a saw to shape the hands into a point or any other shape you like.
7. Attaching the Hands
Secure the clock hands to the clock movement using wood glue or a small screw, depending on your kit. Make sure the hands are centered and pointing towards the correct numbers on your clock face. You can use a protractor to get them perfectly aligned.
8. Creating a Number Design
This is where you can really personalize your clock. You have a few options:
Roman Numerals: Classic and elegant, you can create these by carving them into your wood or using stencils to paint them on.
Arabic Numerals: A modern and practical option. Just find some stencils or write the numbers yourself.
Nature-Inspired: Use dried flowers, leaves, or even small pebbles for a unique and earthy touch.
9. Finishing Touches
Give your clock a final layer of protection with a clear coat. This will prevent scratches and make it easier to clean.
10. Hanging Your Clock
The final step! Attach a hanger to the back of your clock so you can display it proudly in your home.
### Tips for Success
Here are a few extra tips to ensure your clock-making adventure goes smoothly:
Measure Twice, Cut Once: Accuracy is key in woodworking. Double check all your measurements before making any cuts.
Sanding is Your Friend: A smooth finish is important for a beautiful clock. Take your time and sand those edges well!
Protect Your Workspace: Keep your work area clean and free of clutter. You don't want any sawdust getting in your way.
Don't Be Afraid to Experiment: This is your chance to get creative! Add your own personal touch by incorporating decorations, unique wood finishes, or even a different clock movement.
### Enjoy Your Creation
There you have it! Your very own handmade wooden clock, ready to add a touch of charm to your home. Now, go forth and impress your friends and family with your crafty skills! Remember, it's all about the journey and the satisfaction of building something with your own two hands.
So, what are you waiting for? Let's get ticking!
Guide to making a vintage wooden clock at home

Alright, folks, let's talk about something truly timeless: building a vintage wooden clock. This isn't just about telling time; it's about crafting a piece of history right in your own workshop. You'll be surprised at how much you can achieve with a little know-how, some reclaimed wood, and a healthy dose of enthusiasm.
First Things First: Gathering Your Gear
Before we dive into the nitty-gritty, let's make sure you have all the tools and materials ready. Think of it as assembling a team for a grand project:
Wood: The hero of our story! Choose your favorite reclaimed wood. We're going for that vintage vibe, so think weathered oak, rustic pine, or even salvaged barn wood.
Clock Mechanism: The heart of the clock. You can find these online or at a local craft store. Don't worry, we'll talk about choosing the right one for your design.
Wood Glue: Our trusty friend for bonding the pieces together.
Wood Stain and Finish: Let's give our clock some character. A dark walnut stain with a matte finish adds a classic touch, but feel free to experiment with colors and finishes.
Sandpaper: Various grits for smoothing the wood and creating a beautiful surface.
Hand Drill: To create holes for the clock mechanism and hands.
Woodworking Tools: A jigsaw, circular saw, and a trusty tape measure will be your companions.
Clamps: To keep everything secure while the glue dries.
Clock Hands: These will add the finishing touch to your masterpiece.
Crafting Your Clock: From Inspiration to Reality
Now, let's get to the fun part! This is where your creativity truly shines. Here's a breakdown of the process:
1. The Blueprint: Your Design Takes Shape
First, let's sketch out your clock face. Don't be afraid to experiment! Consider these options:
Circular: The classic choice, it offers a timeless elegance.
Square or Rectangular: Adds a touch of modern sophistication.
Unique Shapes: Think heart, flower, or even abstract designs.
Once you have your shape, measure carefully and transfer it to the wood. Use a jigsaw to cut out your clock face.
2. The Body: Building the Frame
For a sturdy base, consider a simple wooden frame. You can choose to use a single piece of wood or create a frame from smaller sections. Use wood glue and clamps to hold the pieces together while they dry.
3. The Heart: Installing the Mechanism
This is where the magic happens! Choose a mechanism that suits your design and aesthetic. We'll discuss different types later. Use your drill to create a hole in the center of your clock face for the mechanism.
4. The Clock Hands: Adding the Final Touches
Select clock hands that complement your clock's style. Attach them to the mechanism according to the instructions.
5. The Finish: Adding Character and Protection
Now for the pièce de résistance! Sand your clock face and frame with various grits of sandpaper for a smooth finish. Apply wood stain and let it dry completely. Apply a protective finish, such as polyurethane, to shield your clock from the elements and enhance its beauty.
Choosing the Right Clock Mechanism
The clock mechanism is the beating heart of your project. Here are some popular options:
Quartz Movement: A reliable and quiet option, perfect for a modern design.
Mechanical Movement: Offers a charming ticking sound and a sense of nostalgia.
Pendulum Movement: A more elaborate option for a classic clock with a graceful swing.
Tips and Tricks: Making Your Clock Unique
Personalization: Add your own touch! Incorporate decorative elements like wood carvings, painted details, or even your own initials.
Creative Clock Face Designs: Instead of traditional Roman numerals, use stencils to create your own unique patterns or symbols.
Reclaimed Materials: Give new life to old wood. Use salvaged beams, pallets, or furniture pieces to create a truly one-of-a-kind clock.
Embracing the Journey: Enjoying the Process
Remember, the most important thing is to have fun! Don't be afraid to experiment, embrace mistakes, and allow your creativity to flow. Building a vintage wooden clock is an adventure that's more about the journey than the destination. You'll learn new skills, discover hidden talents, and create a beautiful piece that will be cherished for years to come.
Now, go forth, grab your tools, and let's build something extraordinary!
How to build a grill gazebo with a comfortable outdoor kitchen

A grill gazebo, seamlessly integrated with a functional and comfortable outdoor kitchen, offers a compelling blend of practicality and luxury. It extends your living space beyond the confines of your home, creating a welcoming and versatile area for entertaining, dining, and enjoying the outdoors. This article provides a comprehensive guide to building this multifaceted structure, covering the essential aspects from planning to construction.
I. Planning and Design:
A. Define the Scope:
Size and Shape: The gazebo's dimensions should accommodate both the grill and the outdoor kitchen, ensuring sufficient space for movement and comfort. Consider the size of your gatherings and the equipment you wish to include. Common shapes include square, rectangular, octagonal, or round, each offering unique aesthetic qualities.
Location: Choose a level and well-drained site that receives adequate sunlight for grilling. Consider the proximity to your home and the desired views from the space.
Budget: Establish a realistic budget before embarking on the project, factoring in materials, labor, and potential unforeseen expenses.
B. Design Considerations:
Grill Selection: Determine the type of grill you desire â" gas, charcoal, or wood-fired â" and select a model that meets your cooking needs and complements the overall design.
Outdoor Kitchen Features: Envision the desired features: countertops, sink, refrigerator, storage, and seating arrangements. Consider the style and materials for a cohesive design.
Style and Aesthetics: Choose a gazebo style that complements your home's architecture and landscaping. Options include traditional, contemporary, rustic, or Mediterranean.
Materials: Select materials that are durable, weather-resistant, and aesthetically pleasing. Popular choices include wood, metal, composite, or a combination.
Accessibility: Ensure the gazebo is accessible for all users, including individuals with disabilities. Consider ramps, wider doorways, and easily maneuverable paths.
II. Construction Process:
A. Foundation and Framing:
Prepare the Site: Clear the site of debris and vegetation, and level the ground. A compacted gravel base provides a solid foundation.
Construct the Foundation: The foundation can be a simple concrete slab, a series of piers, or a raised deck. The chosen foundation type depends on the gazebo's size, weight, and local building codes.
Frame the Gazebo: Use pressure-treated lumber for the base frame, posts, and rafters, ensuring sturdiness and longevity. Follow structural guidelines for your region and consult with a professional if necessary.
B. Roofing and Walls:
Roofing Material: Choose a roofing material that complements the gazebo's style and provides adequate protection from the elements. Popular options include asphalt shingles, metal roofing, or polycarbonate panels.
Wall Panels: If enclosing the gazebo, select wall panels that offer privacy and weather protection. Options include wood, vinyl siding, or fabric panels.
Ventilation: Incorporate adequate ventilation to prevent moisture buildup and ensure proper airflow. Gable vents, louvered panels, or fans can be installed.
C. Outdoor Kitchen Installation:
Countertops: Select durable and weather-resistant countertop materials, such as granite, quartz, stainless steel, or composite. Install the countertops securely and ensure proper drainage.
Sink and Faucet: Choose a sink and faucet suitable for outdoor use, considering durability, functionality, and aesthetics. Ensure plumbing connections are properly sealed and insulated.
Refrigerator: Select a refrigerator designed for outdoor use or a weatherproof model. Install it securely and ensure adequate ventilation.
Storage: Incorporate storage solutions for grilling tools, utensils, and other supplies. Options include cabinets, drawers, and shelves.
D. Finishing Touches:
Lighting: Install lighting for both functional and decorative purposes. Consider LED lights for energy efficiency and longevity.
Seating: Provide comfortable seating arrangements, incorporating outdoor furniture, a dining set, or a fire pit.
Landscaping: Surround the gazebo with attractive landscaping, including plants, flowers, and walkways.
Decor: Add decorative touches, such as curtains, rugs, planters, and artwork, to personalize the space and create a welcoming ambiance.
III. Maintenance and Upkeep:
Regular Cleaning: Clean the gazebo and outdoor kitchen regularly to remove dirt, debris, and spills.
Weatherproofing: Inspect the structure periodically for signs of wear and tear, and apply sealant or paint as needed to protect against weather damage.
Equipment Maintenance: Maintain grilling and kitchen equipment according to manufacturer recommendations to ensure optimal performance and safety.
IV. Safety Considerations:
Electrical Connections: Ensure all electrical connections are properly wired and protected by GFCI outlets to prevent electrical shock.
Fire Safety: Keep a fire extinguisher readily accessible, and practice safe grilling techniques.
Ventilation: Ensure adequate ventilation to prevent carbon monoxide buildup and maintain a safe environment.
Pest Control: Take measures to prevent pests, such as mosquitoes and rodents, from entering the space.
V. Enjoy Your Culinary Oasis:
A well-designed and well-built grill gazebo with a comfortable outdoor kitchen offers a unique and rewarding addition to any home. It provides a dedicated space for entertaining, cooking, and enjoying the outdoors, creating lasting memories and enriching your lifestyle.
Conclusion:
Building a grill gazebo with a comfortable outdoor kitchen requires careful planning, thoughtful design, and meticulous construction. By following these guidelines, you can create a versatile and functional space that enhances your outdoor living experience and provides a welcoming haven for relaxation and entertainment. Remember to prioritize safety, maintain the structure properly, and enjoy the benefits of your culinary oasis for years to come.