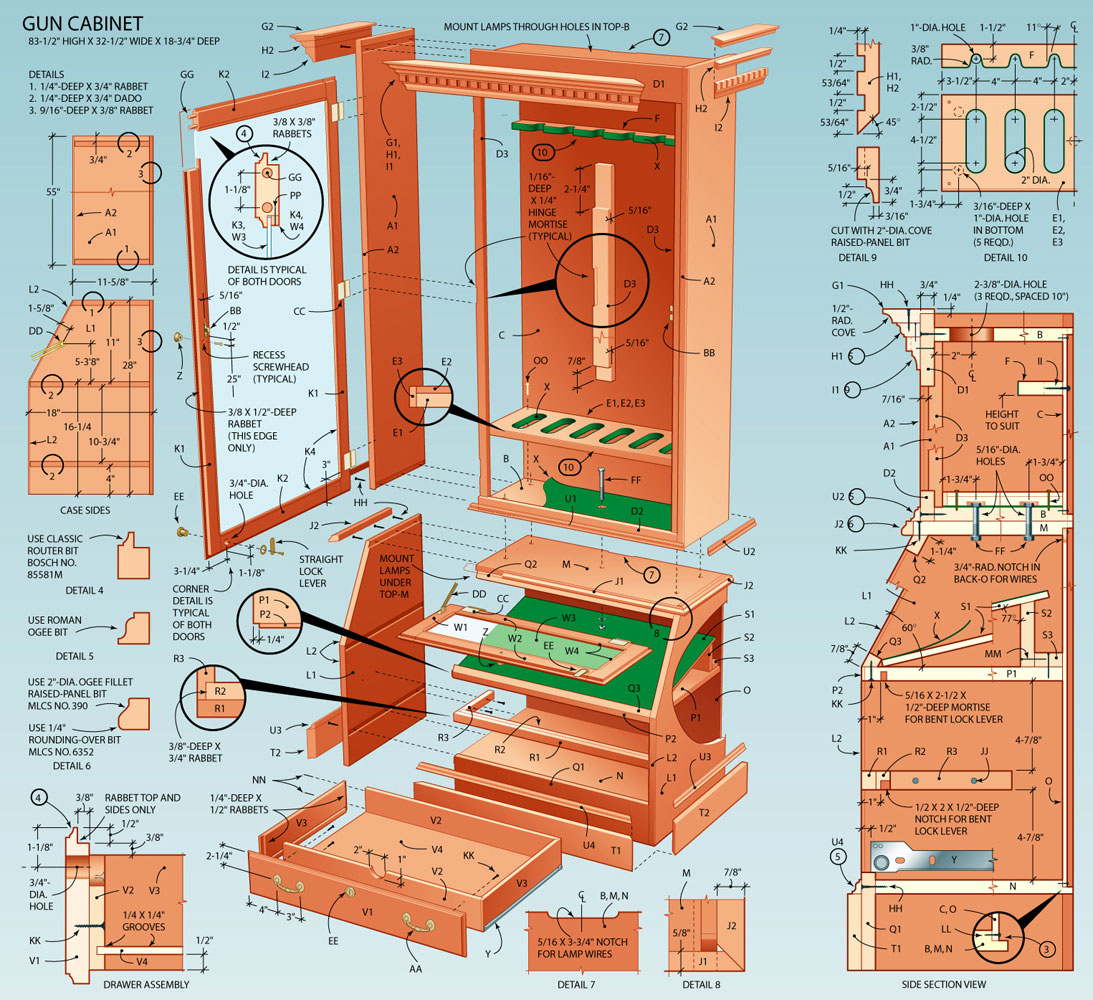
Owning firearms comes with a responsibility to store them securely, and a dedicated gun cabinet is the gold standard for responsible storage. While pre-made cabinets offer convenience, crafting your own wooden gun cabinet allows for a personalized touch and the satisfaction of a hand-built creation. This guide will walk you through the process of constructing a sturdy and aesthetically pleasing gun cabinet, ideal for smaller collections.
1. Planning and Design:
a) Size and Configuration:
Begin by determining the size of your collection and the dimensions of the firearms you intend to store.
Consider the length, width, and height of the largest firearm, and add a few inches for padding and maneuverability.
Decide on the number of shelves or compartments needed. For a small collection, one or two shelves might suffice.
Draw a detailed sketch of your proposed cabinet, including measurements, shelf placement, and any desired decorative elements.
b) Material Selection:
Wood Type: Select sturdy hardwoods like oak, maple, or walnut for durability and aesthetics. Pine or plywood are budget-friendly alternatives.
Thickness: Aim for at least ¾" thickness for the sides, top, bottom, and shelves to provide structural integrity.
Hardware: Choose hinges, locksets, and drawer slides that complement the overall design and meet your security needs. Consider a heavy-duty lock with a keyed mechanism.
2. Tools and Materials:
Power Tools: A table saw, circular saw, drill press, jigsaw, and sander are essential for precise cuts and finishing.
Hand Tools: Hammers, chisels, screwdrivers, clamps, levels, tape measure, and a pencil will be needed for assembly and finishing.
Woodworking Supplies: Glue, wood screws, nails, wood filler, wood stain or paint, and protective finish (varnish, polyurethane) will be required.
Safety Gear: Safety glasses, ear protection, and a dust mask are essential during woodworking.
3. Building the Cabinet Frame:
Cutting the Sides and Top/Bottom: Using your table saw or circular saw, accurately cut the sides, top, and bottom panels to your desired dimensions.
Creating Rabbets: If desired, cut rabbets (recessed grooves) along the inside edges of the sides to create a secure and flush fit for the shelves.
Assembling the Frame: Using wood glue and screws, securely attach the sides, top, and bottom, creating a rectangular frame.
Adding Shelves: Cut the shelf boards to size and glue and screw them into the rabbets or place them on supports inside the cabinet.
4. Adding Doors and Locksets:
Door Cutting: Measure and cut the door panels from your chosen wood. For a simple design, two single doors are suitable. For a more elaborate design, you could create a single door with multiple panels.
Creating Mortises and Tenons: If desired, use a chisel to create mortises (rectangular recesses) in the door stiles (vertical pieces) and matching tenons (projections) on the door rails (horizontal pieces) for a classic joinery technique.
Installing Hinges: Install hinges on the doors and the cabinet frame. Consider heavy-duty hinges for added strength.
Installing Lockset: Drill the necessary holes and install the chosen lockset on one of the doors. Ensure the latch aligns correctly with the strike plate on the cabinet frame.
5. Finishing Touches:
Sanding: Sand all surfaces with increasing grit levels to remove imperfections and create a smooth finish.
Filling Gaps: Use wood filler to fill any gaps or imperfections in the wood.
Staining or Painting: Apply your chosen stain or paint, ensuring even coverage and allowing for drying time.
Sealing: Apply a protective finish like varnish or polyurethane to enhance the beauty and durability of the wood.
6. Additional Features and Tips:
Drawer: Consider adding a small drawer to the bottom of the cabinet for storing cleaning supplies or other accessories.
Padding: Line the shelves with felt or foam padding to prevent scratches on your firearms.
Lighting: Install a small LED light inside the cabinet for easy access.
Ventilation: Ensure proper ventilation within the cabinet to prevent moisture buildup.
Safety Features: Consider adding a safety feature such as a firearm cable lock to the cabinet.
7. Safety Considerations:
Always Wear Safety Gear: Protect yourself from potential hazards by wearing safety glasses, ear protection, and a dust mask.
Proper Tool Use: Use tools correctly and be aware of potential kickbacks or injuries.
Fire Safety: Be mindful of fire hazards when using power tools and applying finishes.
Storage and Handling: Store firearms responsibly and always handle them with caution.
8. Conclusion:
Building a wooden gun cabinet is a rewarding project that combines woodworking skills with responsible gun ownership. With careful planning, attention to detail, and a commitment to safety, you can create a durable and aesthetically pleasing cabinet that will protect your firearms for years to come. Remember, the final design and construction are limited only by your creativity and skill level. So, take your time, enjoy the process, and be proud of your hand-built masterpiece.

0 comments:
Post a Comment