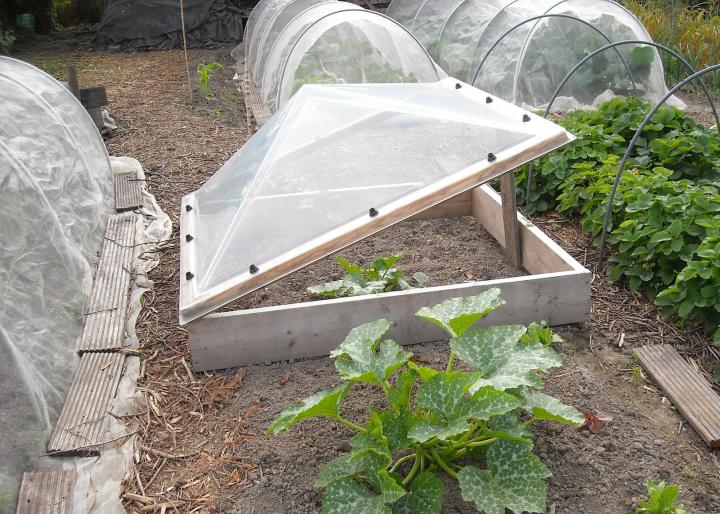
How to Build a Portable Cold Frame
A cold frame is a simple but effective structure that allows you to extend your growing season and get a head start on your gardening. It essentially creates a mini-greenhouse, trapping solar heat and protecting plants from harsh weather conditions. Portable cold frames are particularly beneficial for gardeners with limited space or who want the flexibility to move the structure to different locations. This guide will provide a step-by-step walkthrough of how to build your own portable cold frame.
Materials
Before you begin, gather the following materials:
- Wooden frame materials: Choose sturdy, rot-resistant wood like cedar, redwood, or pressure-treated lumber. You'll need boards for the base, sides, and top.
- Glass or polycarbonate panels: These will serve as the transparent covering for your cold frame. Polycarbonate is more durable and impact-resistant than glass.
- Hinges: These will connect the lid to the frame.
- Screws: Use appropriate-sized screws for your wood and panel type.
- Weatherstripping: This will create a tight seal around the lid to prevent heat loss.
- Paint or sealant: Optional, but recommended for protecting the wood from the elements.
- Tools: You'll need a saw, drill, screwdriver, measuring tape, level, and pencil.
Choosing the Right Size and Dimensions
The size of your portable cold frame will depend on your needs and available space. Consider these factors:
- Number of plants: Determine the size of the cold frame needed to comfortably accommodate the plants you plan to grow.
- Available space: Measure your available space and choose a cold frame that fits comfortably and can be easily moved around your garden.
- Ease of handling: Make sure the cold frame is a manageable size and weight for you to move around.
A standard portable cold frame is typically 3-4 feet wide, 4-5 feet long, and 1-2 feet high. These dimensions allow for a good balance of internal space and portability.
Construction Steps
Follow these steps to build your portable cold frame:
Step 1: Build the Base
- Cut two pieces of lumber for the length of the base and two pieces for the width. Ensure these pieces are square and straight.
- Attach the pieces together using screws or nails to form a rectangle.
- Optionally, add cross braces for extra strength and stability.
Step 2: Assemble the Sides
- Cut four pieces of lumber to the desired height of the cold frame. These will form the sides.
- Attach the sides to the base using screws or nails, ensuring they are square and level.
- For added support, add corner bracing to the sides.
Step 3: Create the Lid
- Cut two pieces of lumber for the length of the lid and two pieces for the width.
- Attach the pieces together to form a rectangle, similar to the base.
- Cut pieces of glass or polycarbonate to fit the lid dimensions.
- Attach the glass or polycarbonate panels to the lid using screws or adhesive.
Step 4: Attach the Lid to the Frame
- Position the lid on top of the frame and mark hinge locations.
- Attach the hinges to the lid and frame using screws.
- Secure the lid to the frame using a latch or other locking mechanism.
Step 5: Add Weatherstripping
- Apply weatherstripping around the edges of the lid to create a tight seal.
- This will help prevent heat loss and keep the cold frame warm.
Step 6: Finishing Touches
- Sand the wood smooth and apply a sealant or paint for protection.
- Consider adding handles to the sides of the cold frame for easier transport.
- You can create a raised bottom using bricks or wood blocks to improve drainage and ventilation.
Using Your Portable Cold Frame
Once your portable cold frame is built, you can start using it to extend your gardening season and protect your plants:
- Choose the right location: Select a sunny spot with good drainage for your cold frame. Ensure it's easily accessible for planting and maintenance.
- Prepare the soil: Fill the cold frame with a good quality potting mix or soil. Ensure it's well-drained to prevent root rot.
- Plant your seedlings: Carefully transplant seedlings into the cold frame, leaving adequate space between them.
- Monitor temperature and ventilation: Regularly check the temperature inside the cold frame and adjust ventilation as needed to maintain optimal growing conditions.
- Water regularly: Keep the soil moist, but not waterlogged.
- Protect from pests and diseases: Monitor for pests and diseases and take appropriate measures to control them.
Benefits of a Portable Cold Frame
Using a portable cold frame offers several advantages for gardeners:
- Extended growing season: Cold frames help extend the growing season by protecting plants from frost and cold temperatures.
- Head start on seedlings: Start seeds indoors in the cold frame for a head start on the outdoor season.
- Protection from harsh weather: Cold frames shield plants from wind, hail, and other weather conditions.
- Improved soil warmth: Cold frames trap solar heat, warming the soil and creating a favorable microclimate for plant growth.
- Versatility: Move the cold frame to different locations within your garden to optimize sunlight exposure or protect specific plants.
- Space efficiency: Ideal for gardeners with limited space as they can be placed on patios, balconies, or even indoors.
Conclusion
Building a portable cold frame is a rewarding DIY project that can significantly enhance your gardening experience. With careful planning and construction, you can create a durable and functional structure that will extend your growing season, protect your plants, and provide numerous other benefits. By following the steps outlined in this guide, you can enjoy the advantages of a portable cold frame and reap the rewards of a successful and productive garden.

0 comments:
Post a Comment