Pages

Tuesday, November 12, 2024

Expert Tips for Finishing a DIY Bedside Cabinet

Expert Tips for Finishing a DIY Bedside Cabinet

Expert Tips for Finishing a DIY Bedside Cabinet: Achieving a Professional Look

Building a bedside cabinet is a rewarding DIY project that allows you to create a custom piece that perfectly complements your bedroom decor. However, the true magic lies in the finishing touches. A flawless finish elevates a handmade cabinet from good to exceptional, showcasing your craftsmanship and adding a touch of elegance to your space.

This guide provides expert tips and techniques to help you achieve a professional-looking finish on your DIY bedside cabinet, ensuring a long-lasting and beautiful result.

Preparation is Key: Setting the Stage for Success

A meticulous preparation process is the foundation of a flawless finish. Neglecting this step can lead to uneven application, blemishes, and a subpar final result.

1. Sanding to Perfection

Sanding removes any imperfections, smooths the surface, and creates the ideal base for paint or stain. Start with a coarse grit sandpaper (80-120 grit) to remove any rough edges or blemishes. Gradually progress to finer grits (150-220 grit) to achieve a smooth, even surface.

  • Use a sanding block for flat surfaces to maintain consistent pressure.
  • For intricate details, use sandpaper wrapped around a sanding sponge or a small piece of wood.
  • Sand in the direction of the wood grain to avoid scratches.

2. Dust Removal: Eliminating Contaminants

Sanding generates dust, which can interfere with the adhesion of paint or stain. After sanding, thoroughly clean the cabinet with a tack cloth or a damp cloth to remove any dust particles.

  • Tack cloths are excellent for picking up fine dust and lint.
  • For stubborn dust, use a damp cloth, but ensure it's completely dry before applying any finishes.

3. Filling Imperfections: Achieving a Seamless Surface

Wood filler can be used to address minor imperfections, such as nail holes, cracks, or gaps. Choose a wood filler that matches the color of your wood or the desired finish.

  • Apply a thin layer of wood filler with a putty knife, ensuring it's level with the surface.
  • Allow the wood filler to dry completely as per the manufacturer's instructions.
  • Sand the filled areas smoothly to blend them with the surrounding wood.

Choosing the Right Finish: Tailoring Your Cabinet's Look

The finish you choose will determine the aesthetic and durability of your bedside cabinet. Consider the desired look, the wood species, and the environment where the cabinet will be placed.

1. Paint: A Versatile and Colorful Option

Paint offers an excellent way to create a vibrant, modern, or rustic look.

  • Latex paint is water-based, dries quickly, and is easy to clean up.
  • Oil-based paint provides a durable, hard-wearing finish but requires mineral spirits for cleanup.
  • Chalk paint offers a matte, vintage-inspired look and can be easily distressed for a unique aesthetic.

2. Stain: Enhancing the Natural Beauty of Wood

Stain allows the wood grain to show through while adding color and depth.

  • Oil-based stains penetrate the wood deeply and create a rich, even color.
  • Water-based stains are easier to clean up but may not penetrate as deeply as oil-based stains.
  • Gel stains are thick and provide excellent coverage, ideal for filling in pores and creating a more uniform color.

3. Varnish: Protecting and Enhancing the Finish

Varnish provides a clear, protective layer over paint or stain, enhancing the appearance and durability of the finish.

  • Polyurethane is a popular choice for its durability and water resistance.
  • Lacquer offers a glossy, hard-wearing finish but can be more difficult to apply.
  • Shellac provides a warm, natural look and can be used for furniture that will be exposed to food or beverages.

Application Techniques: Ensuring a Smooth and Even Finish

The way you apply your finish can significantly impact the final result. Here are some tips for achieving a professional-looking finish.

1. Thinning the Finish: Achieving Optimal Consistency

Some finishes, such as paints and stains, benefit from thinning for easier application and better flow. Always consult the manufacturer's instructions for the recommended thinning ratio and the appropriate thinner to use.

2. Brushes and Rollers: Tools for a Smooth Finish

The type of brush or roller you use can influence the finish's smoothness and appearance.

  • Use a natural bristle brush for oil-based paints and stains.
  • Synthetic bristle brushes are better suited for water-based paints and stains.
  • For larger surfaces, a foam roller can provide even coverage.

3. Application Techniques: Avoiding Brush Marks and Streaks

Proper application techniques can help prevent brush marks, streaks, and other imperfections.

  • Use long, even strokes in the direction of the wood grain.
  • Don't overload your brush or roller.
  • Overlap each stroke slightly to avoid leaving gaps.
  • If using paint, apply thin coats for best results.

Finishing Touches: Bringing Your Bedside Cabinet to Life

Once your finish has dried, you can add finishing touches to personalize your bedside cabinet and make it truly unique.

1. Distressing: Adding a Vintage Appeal

Distressing can give your cabinet a rustic, vintage-inspired look. Use sandpaper or a sanding block to create subtle wear and tear, highlighting the wood grain and creating a more natural feel.

2. Hardware: Accentuating Functionality and Style

Choosing the right hardware can make a big difference in the overall appearance and functionality of your cabinet. Consider knobs, handles, drawer pulls, and hinges that complement the chosen finish and style.

3. Protective Sealants: Enhancing Durability and Protection

Apply a sealant to protect your finish from scratches, stains, and water damage. Polyurethane is a popular choice for its durability and water resistance.

Conclusion: Crafting a Bedside Cabinet that Exudes Quality and Style

By following these expert tips, you can transform your DIY bedside cabinet into a stunning piece of furniture that exudes quality and style. Remember, patience and attention to detail are key. Take your time, work meticulously, and enjoy the process of creating a beautiful and functional addition to your bedroom.

Read More..

Free DIY Compost Bin Blueprints (Downloadable PDF)

Free DIY Compost Bin Blueprints (Downloadable PDF)

Free DIY Compost Bin Blueprints (Downloadable PDF)

Composting is a fantastic way to reduce waste, improve soil health, and create a nutrient-rich fertilizer for your garden. While there are many commercially available compost bins on the market, building your own can be a rewarding and cost-effective project. This article provides you with free, downloadable blueprints for creating your very own DIY compost bin, allowing you to customize it to your specific needs and preferences.

Benefits of Building a DIY Compost Bin

There are numerous benefits to building your own compost bin, including:

  • Cost-effectiveness: DIY compost bins are significantly cheaper than purchasing pre-made ones. You can often use readily available materials like pallets, wood, or even concrete blocks.
  • Customization: You can design your compost bin to fit your specific space, aesthetic preferences, and composting needs. This allows for flexibility in size, shape, and features.
  • Greater Control: Building your own compost bin gives you complete control over the materials used, the construction process, and the composting method. This empowers you to create a system that works best for you.
  • Environmental Sustainability: By using recycled or repurposed materials, you can significantly reduce your environmental footprint and contribute to a more sustainable lifestyle.

Choosing the Right Compost Bin Design

Before you start building, it's essential to consider the various compost bin designs available. Each design has its advantages and disadvantages, and the best choice will depend on your specific circumstances. Here are a few popular options:

Three-Bin System

This system consists of three separate bins. One bin is used for active composting, another for finished compost, and the third for holding materials that need to break down further. The three-bin system allows you to manage the composting process efficiently and consistently.

Tumbler Composter

Tumbler composters are enclosed drums that rotate, ensuring even aeration and mixing of materials. They are relatively compact, ideal for smaller gardens, and offer faster composting times.

Hot Compost Bin

These bins are specifically designed to generate high temperatures for faster composting. They often have a larger capacity and are suitable for larger quantities of organic materials.

DIY Pallet Bin

A popular and simple option, using salvaged pallets for construction is both economical and environmentally friendly. You can create a single or multi-bin system using pallets.

Concrete Block Bin

Concrete blocks offer a durable and long-lasting construction. You can create a multi-bin system or a single bin depending on your requirements.

Compost Bin Blueprints: Free Downloadable PDF

Below are links to free downloadable PDF blueprints for various DIY compost bin designs:

Three-Bin System Blueprint

[Link to Downloadable PDF Blueprint]

Tumbler Composter Blueprint

[Link to Downloadable PDF Blueprint]

Hot Compost Bin Blueprint

[Link to Downloadable PDF Blueprint]

DIY Pallet Bin Blueprint

[Link to Downloadable PDF Blueprint]

Concrete Block Bin Blueprint

[Link to Downloadable PDF Blueprint]

Materials and Tools Needed

The specific materials and tools required will vary depending on the chosen compost bin design. However, some common materials include:

  • Wood (lumber, pallets)
  • Concrete blocks
  • Hardware (screws, nails, hinges, brackets)
  • Mesh wire (for ventilation)
  • Tools (saw, drill, hammer, screwdriver, level)

Building Instructions

The detailed building instructions will be provided in the downloadable PDF blueprints. However, here are some general steps involved in constructing a compost bin:

  1. Gather Materials: Ensure you have all the necessary materials and tools before starting.
  2. Prepare the Site: Choose a suitable location for your compost bin, ensuring adequate drainage and sunlight exposure.
  3. Cut and Assemble Frame: Cut the wood or other materials to the specified dimensions and assemble the frame using screws or nails.
  4. Add Ventilation: Install mesh wire on the sides or bottom of the bin for proper airflow.
  5. Construct Lid: Create a lid for the bin, allowing for easy access and aeration.
  6. Finishing Touches: Apply paint or stain to protect the wood and enhance the appearance of the bin.

Composting Tips and Techniques

Once your compost bin is built, follow these composting tips for successful results:

  • Brown to Green Ratio: Maintain a balanced mix of brown materials (carbon-rich) like leaves and twigs, and green materials (nitrogen-rich) like grass clippings and food scraps.
  • Moisture: Keep the compost moist, similar to a wrung-out sponge. Avoid overwatering or allowing it to dry out.
  • Aeration: Ensure proper airflow by turning the compost regularly or using a bin design that allows for sufficient ventilation.
  • Temperature: Ideal composting temperatures range from 130-160 degrees Fahrenheit. This can be achieved by maintaining a balanced brown-to-green ratio and ensuring proper aeration.
  • Patience: Composting takes time. Depending on the method and climate, it can take anywhere from a few weeks to several months for compost to break down completely.

Conclusion

Building your own compost bin is a rewarding and eco-friendly project that provides numerous benefits. These free DIY compost bin blueprints allow you to customize your composting system to fit your needs and preferences. With proper planning, construction, and composting techniques, you can easily transform your kitchen and garden waste into valuable fertilizer, contributing to a more sustainable lifestyle and enhancing your garden's health and productivity.

Read More..

How to Make a Classic Wooden Birdhouse with Simple Materials

How to Make a Classic Wooden Birdhouse with Simple Materials

Crafting a Classic Wooden Birdhouse: A Step-by-Step Guide

Birdhouses, charming additions to any garden or backyard, provide shelter and nesting opportunities for our feathered friends. Constructing a classic wooden birdhouse is a rewarding project that allows you to create a unique haven for birds while enjoying the process of woodworking. This comprehensive guide will lead you through the steps of crafting a beautiful and functional birdhouse using simple materials.

Materials and Tools

Before embarking on your birdhouse construction, ensure you have the following materials and tools readily available:

Materials

  • Wood: Select a rot-resistant and weatherproof wood, such as cedar, redwood, or treated pine. A 1x6-inch board will be sufficient for the majority of the birdhouse.
  • Screws: Use 1-1/4 inch or 1-1/2 inch wood screws for assembly.
  • Wood glue: Use a strong wood glue for secure bonding.
  • Paint or stain (optional): Choose a bird-safe paint or stain to protect the wood and enhance the aesthetic appeal.
  • Roofing shingles (optional): Shingles can add durability and a rustic touch to the roof.

Tools

  • Circular saw or hand saw: Used for cutting the wood to size.
  • Measuring tape: For accurate measurements and marking.
  • Pencil or marker: For marking cuts and assembly lines.
  • Drill with drill bits: For pre-drilling holes to prevent wood splitting and screwing.
  • Screwdriver or drill driver: For driving screws.
  • Safety glasses: Protect your eyes from sawdust and flying debris.
  • Sandpaper: For smoothing rough edges and surfaces.
  • Level: Ensures that the birdhouse is level and stable.
  • Clamps (optional): To hold pieces together during assembly.

Designing Your Birdhouse

The design of your birdhouse can be tailored to your preferences and the specific bird species you intend to attract. Consider the following factors:

Size and Shape

The size of the entrance hole and the overall dimensions of the birdhouse should correspond to the bird species you wish to attract. For example, a small birdhouse with a 1-1/2-inch entrance hole would be suitable for chickadees or wrens, while a larger birdhouse with a 2-1/2-inch entrance would accommodate bluebirds or robins.

Entrance Placement

The entrance hole should be positioned near the top of the birdhouse, typically around 6 inches from the bottom. This placement helps protect the nest from predators and rain.

Roof Style

There are various roof styles to choose from, including gable, shed, and hip roofs. Gable roofs are popular for their classic look and effective water drainage. Shed roofs are simpler to construct, while hip roofs provide maximum protection from the elements.

Ventilation and Drainage

Adequate ventilation is crucial for maintaining a healthy nesting environment. Ensure the birdhouse has ventilation holes on the sides or under the roof. Consider adding a slight pitch to the roof to facilitate water drainage.

Construction Steps

Now that you have your materials and design in mind, let's delve into the construction process:

Step 1: Cutting the Wood

  • Using the measurements from your chosen design, cut the wood into the required pieces. The main components will include the base, sides, back, front (including the entrance hole), and roof pieces.
  • Mark the location of the entrance hole on the front piece using a pencil or marker.
  • Carefully cut out the entrance hole using a jigsaw or drill with a hole saw.

Step 2: Assembling the Base and Sides

  • Apply wood glue to the edges of the base and side pieces. Align them securely, ensuring a right angle, and clamp them together.
  • Pre-drill pilot holes and screw the side pieces to the base using wood screws.
  • Repeat this process for the other side, ensuring that both sides are symmetrically attached to the base.

Step 3: Attaching the Back and Front

  • Apply wood glue to the edges of the back and front pieces. Carefully align them with the assembled base and sides.
  • Pre-drill pilot holes and screw the back and front pieces to the sides and base.
  • Use clamps if necessary to ensure tight and secure joints.

Step 4: Constructing the Roof

  • Cut two identical roof pieces from the wood, ensuring the correct length and angle for your chosen roof style.
  • Apply wood glue to the edges of the roof pieces and carefully align them with the birdhouse frame, creating a slight overhang.
  • Pre-drill pilot holes and screw the roof pieces to the top of the birdhouse.
  • If using roofing shingles, attach them to the roof using roofing nails or staples, ensuring that they overlap properly.

Step 5: Finishing Touches

  • Sand all the surfaces of the birdhouse to remove any rough edges or imperfections.
  • Apply a bird-safe paint or stain to protect the wood and enhance the appearance. Allow the paint or stain to dry completely before handling.
  • Once the paint or stain has dried, you can add additional decorative touches, such as a birdhouse sign or a small perch near the entrance hole.

Installation and Placement

Once your birdhouse is complete, it's time to find the perfect spot for it in your yard.

Location

  • Choose a location that provides shelter from direct sunlight, wind, and rain. A location under a tree or near a shrub can provide natural shade and protection.
  • Avoid placing the birdhouse too close to the ground, as this can make it vulnerable to predators.
  • Position the birdhouse at least 5 feet from the ground, or higher if possible.

Mounting

  • Attach the birdhouse to a sturdy support, such as a tree, post, or fence, using screws or brackets. Ensure that the birdhouse is level and stable.
  • Consider adding a small piece of wood or metal to the underside of the birdhouse as a landing platform for birds to perch before entering.

Maintenance and Cleaning

To ensure the longevity and safety of your birdhouse, regular maintenance is crucial.

Cleaning

  • Clean the birdhouse after the nesting season is over, usually in the fall. Remove any old nesting materials and debris.
  • You can use a brush or vacuum cleaner to clean the interior of the birdhouse. Avoid using harsh chemicals that could harm birds.
  • Inspect the birdhouse for any signs of damage or deterioration and repair or replace any worn or broken parts.

Predator Control

  • Keep the surrounding area around the birdhouse free of clutter and potential nesting sites for predators.
  • Consider adding a predator guard, such as a metal or plastic shield, around the entrance hole to deter cats or snakes.

Conclusion

Crafting a classic wooden birdhouse is a rewarding and fulfilling project that allows you to contribute to bird conservation while enjoying the satisfaction of creating something beautiful and functional. By following these steps and incorporating your own creativity, you can build a lasting haven for birds in your backyard and witness the joy of seeing them nest and raise their young.

Read More..

Squirrel Den Box Plans and Instructions PDF

Squirrel Den Box Plans and Instructions PDF

Squirrel Den Box Plans and Instructions

Welcome to the world of backyard wildlife enhancement! This comprehensive guide will equip you with the knowledge and detailed plans to build a cozy and safe squirrel den box. This project is perfect for nature enthusiasts who want to attract these playful creatures to their gardens, providing them with a comfortable shelter while adding a touch of charm to your outdoor space.

Choosing the Right Location

Before embarking on construction, it's crucial to select a prime location for your squirrel den box. Consider the following factors:

  • Elevation and Drainage: Place the box at least 18 inches off the ground to prevent flooding and predator access. Ensure the location has good drainage to prevent water pooling around the base.
  • Sun Exposure: Squirrels prefer a spot with some shade during the hottest parts of the day, but also with adequate sunlight for warmth. A location under a deciduous tree that offers shade in the summer and allows sunlight in the winter is ideal.
  • Accessibility: Choose a spot easily accessible for you to check the box and clean it periodically. It should be near a tree for easy squirrel access but not directly on the trunk, as this can attract bark beetles.
  • Predators: Avoid placing the box too close to potential predator dens such as hawks, owls, or snakes. Consider natural barriers like thick shrubs or a dense hedge for added protection.

Materials and Tools

For this project, we'll utilize readily available and durable materials. Gather the following:

Materials

  • Wood: Use untreated, weather-resistant wood like cedar, redwood, or pressure-treated lumber. Avoid using plywood as it can easily deteriorate.
  • Screws: Galvanized or stainless steel screws are recommended for their durability and resistance to rust.
  • Roofing Shingles: Use asphalt shingles for a waterproof roof that will last for years.
  • Paint or Stain: Optional, but adding a coat of paint or stain can help protect the wood and enhance the aesthetic appeal of the box.

Tools

  • Measuring Tape: Accuracy is essential for precise cuts.
  • Saw: A circular saw, jigsaw, or handsaw will be needed for cutting the wood.
  • Drill: With a variety of drill bits for pilot holes and screw insertion.
  • Screwdriver: For secure fastening of the box components.
  • Hammer: For securing the roofing shingles.
  • Level: Ensuring the box is straight and level for proper construction.
  • Safety Glasses: Always protect your eyes when using power tools.
  • Work Gloves: For safe handling of the wood and tools.

Squirrel Den Box Plans

Here are the detailed plans for constructing a squirrel den box:

Dimensions

  • Front Panel: 12 inches wide x 10 inches high
  • Back Panel: 12 inches wide x 10 inches high
  • Side Panels: 8 inches wide x 10 inches high (2 pieces)
  • Floor: 12 inches wide x 8 inches deep
  • Roof: 14 inches wide x 12 inches deep
  • Entrance Hole: 3 inches in diameter

Construction Steps

  1. Cut the Wood: Using your chosen saw, cut the wood to the specified dimensions for the front, back, side panels, floor, and roof.
  2. Assemble the Walls: Lay the front and back panels flat, side by side. Attach the two side panels to the front and back panels using screws. Ensure the panels are flush and square.
  3. Create the Entrance: On the front panel, drill a 3-inch diameter hole for the entrance. Use a drill bit slightly smaller than the desired hole diameter, then gradually enlarge it with a hole saw or by using a jigsaw with a curved cutting guide.
  4. Attach the Floor: Place the floor panel inside the assembled box, aligning the edges. Secure it to the bottom of the walls using screws.
  5. Add Roof Supports: Cut two pieces of wood for roof supports, each measuring 8 inches long. Place them across the inside of the box, parallel to the back panel, and about 2 inches from the top. Secure the supports to the side walls using screws.
  6. Install the Roof: Place the roof panel on top of the box, aligning it with the edges of the walls. Attach the roof to the support pieces using screws.
  7. Secure the Roof: To ensure a weatherproof seal, install roofing shingles over the top of the roof. Use a hammer to secure the shingles in place.
  8. Paint or Stain: (Optional) Apply a coat of paint or stain to the exterior of the box. Let it dry completely before placing the box in its final location.
  9. Placement: Mount the squirrel den box to a sturdy tree or post at least 18 inches off the ground. Use galvanized or stainless steel brackets or screws to secure the box.

    Tips and Maintenance

    • Ventilation: Ensure the box has adequate ventilation by drilling small holes near the top of the back panel. This will prevent moisture buildup inside.
    • Cleaning: Clean the den box at least once a year, or more frequently if needed, to remove debris, droppings, and parasites. Use a stiff brush and soapy water to thoroughly clean the interior and exterior.
    • Monitoring: Keep an eye on the squirrel den box for signs of damage or wear and tear. Repair or replace any damaged parts promptly.
    • Wildlife Considerations: Remember that squirrels are wild animals, and they may not always use your den box. Be patient and create a welcoming environment in your yard with ample food sources and water. Avoid using pesticides or herbicides that could harm squirrels or other wildlife.

    Congratulations on completing your squirrel den box! This delightful project will not only provide a safe and cozy haven for squirrels but also add a touch of charm to your backyard. As you observe these playful creatures enjoying their new home, you'll be contributing to the vibrant ecosystem of your local environment.

Read More..

How to Build a Portable Cold Frame

How to Build a Portable Cold Frame

How to Build a Portable Cold Frame

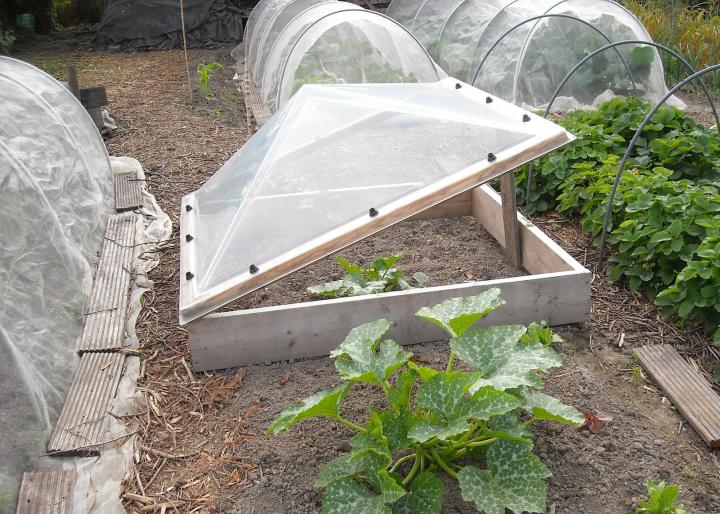
A cold frame is a simple but effective structure that allows you to extend your growing season and get a head start on your gardening. It essentially creates a mini-greenhouse, trapping solar heat and protecting plants from harsh weather conditions. Portable cold frames are particularly beneficial for gardeners with limited space or who want the flexibility to move the structure to different locations. This guide will provide a step-by-step walkthrough of how to build your own portable cold frame.

Materials

Before you begin, gather the following materials:

  • Wooden frame materials: Choose sturdy, rot-resistant wood like cedar, redwood, or pressure-treated lumber. You'll need boards for the base, sides, and top.
  • Glass or polycarbonate panels: These will serve as the transparent covering for your cold frame. Polycarbonate is more durable and impact-resistant than glass.
  • Hinges: These will connect the lid to the frame.
  • Screws: Use appropriate-sized screws for your wood and panel type.
  • Weatherstripping: This will create a tight seal around the lid to prevent heat loss.
  • Paint or sealant: Optional, but recommended for protecting the wood from the elements.
  • Tools: You'll need a saw, drill, screwdriver, measuring tape, level, and pencil.

Choosing the Right Size and Dimensions

The size of your portable cold frame will depend on your needs and available space. Consider these factors:

  • Number of plants: Determine the size of the cold frame needed to comfortably accommodate the plants you plan to grow.
  • Available space: Measure your available space and choose a cold frame that fits comfortably and can be easily moved around your garden.
  • Ease of handling: Make sure the cold frame is a manageable size and weight for you to move around.

A standard portable cold frame is typically 3-4 feet wide, 4-5 feet long, and 1-2 feet high. These dimensions allow for a good balance of internal space and portability.

Construction Steps

Follow these steps to build your portable cold frame:

Step 1: Build the Base

  • Cut two pieces of lumber for the length of the base and two pieces for the width. Ensure these pieces are square and straight.
  • Attach the pieces together using screws or nails to form a rectangle.
  • Optionally, add cross braces for extra strength and stability.

Step 2: Assemble the Sides

  • Cut four pieces of lumber to the desired height of the cold frame. These will form the sides.
  • Attach the sides to the base using screws or nails, ensuring they are square and level.
  • For added support, add corner bracing to the sides.

Step 3: Create the Lid

  • Cut two pieces of lumber for the length of the lid and two pieces for the width.
  • Attach the pieces together to form a rectangle, similar to the base.
  • Cut pieces of glass or polycarbonate to fit the lid dimensions.
  • Attach the glass or polycarbonate panels to the lid using screws or adhesive.

Step 4: Attach the Lid to the Frame

  • Position the lid on top of the frame and mark hinge locations.
  • Attach the hinges to the lid and frame using screws.
  • Secure the lid to the frame using a latch or other locking mechanism.

Step 5: Add Weatherstripping

  • Apply weatherstripping around the edges of the lid to create a tight seal.
  • This will help prevent heat loss and keep the cold frame warm.

Step 6: Finishing Touches

  • Sand the wood smooth and apply a sealant or paint for protection.
  • Consider adding handles to the sides of the cold frame for easier transport.
  • You can create a raised bottom using bricks or wood blocks to improve drainage and ventilation.

Using Your Portable Cold Frame

Once your portable cold frame is built, you can start using it to extend your gardening season and protect your plants:

  • Choose the right location: Select a sunny spot with good drainage for your cold frame. Ensure it's easily accessible for planting and maintenance.
  • Prepare the soil: Fill the cold frame with a good quality potting mix or soil. Ensure it's well-drained to prevent root rot.
  • Plant your seedlings: Carefully transplant seedlings into the cold frame, leaving adequate space between them.
  • Monitor temperature and ventilation: Regularly check the temperature inside the cold frame and adjust ventilation as needed to maintain optimal growing conditions.
  • Water regularly: Keep the soil moist, but not waterlogged.
  • Protect from pests and diseases: Monitor for pests and diseases and take appropriate measures to control them.

Benefits of a Portable Cold Frame

Using a portable cold frame offers several advantages for gardeners:

  • Extended growing season: Cold frames help extend the growing season by protecting plants from frost and cold temperatures.
  • Head start on seedlings: Start seeds indoors in the cold frame for a head start on the outdoor season.
  • Protection from harsh weather: Cold frames shield plants from wind, hail, and other weather conditions.
  • Improved soil warmth: Cold frames trap solar heat, warming the soil and creating a favorable microclimate for plant growth.
  • Versatility: Move the cold frame to different locations within your garden to optimize sunlight exposure or protect specific plants.
  • Space efficiency: Ideal for gardeners with limited space as they can be placed on patios, balconies, or even indoors.

Conclusion

Building a portable cold frame is a rewarding DIY project that can significantly enhance your gardening experience. With careful planning and construction, you can create a durable and functional structure that will extend your growing season, protect your plants, and provide numerous other benefits. By following the steps outlined in this guide, you can enjoy the advantages of a portable cold frame and reap the rewards of a successful and productive garden.

Read More..

How to design and build a grill gazebo with custom lighting

How to design and build a grill gazebo with custom lighting

Designing and Building a Grill Gazebo with Custom Lighting

A grill gazebo offers a versatile outdoor space for entertaining, cooking, and relaxation. By adding custom lighting, you can elevate the ambiance and functionality of your gazebo, transforming it into a captivating focal point. This comprehensive guide outlines the essential steps involved in designing and building a grill gazebo with custom lighting, empowering you to create a truly unique and enjoyable outdoor haven.

Conceptualizing Your Grill Gazebo

The initial step in the design process involves clearly visualizing your ideal grill gazebo. Consider the following factors:

Size and Shape

Determine the appropriate size to accommodate your grill, seating, and other desired amenities. Common gazebo shapes include square, rectangular, octagonal, and hexagonal, each offering distinct visual appeal and space utilization.

Material Selection

Choose materials that align with your aesthetic preferences and durability requirements. Popular options include:

  • Wood: Offers a classic and warm aesthetic but requires regular maintenance.
  • Aluminum: Lightweight, rust-resistant, and low-maintenance.
  • Vinyl: Durable, weather-resistant, and available in various colors.
  • Fabric: Provides shade and a more open feel but may require replacement over time.

Lighting Concept

Envision the lighting scheme that will complement your gazebo's design and create the desired atmosphere. Consider:

  • Ambient Lighting: Provides general illumination for the entire space.
  • Task Lighting: Focuses on specific areas like the grilling station or dining table.
  • Accent Lighting: Highlights architectural features or landscaping.

Budget and Timeframe

Establish a realistic budget and timeline for the project. Factor in costs for materials, labor (if hiring professionals), permits, and potential unforeseen expenses. This will help you stay on track and make informed decisions throughout the design and construction process.

Planning and Design

With your initial concept in mind, it's time to translate your vision into a detailed plan. This stage involves:

Drawing a Detailed Sketch

Create a scaled drawing of the gazebo, outlining its dimensions, shape, roof design, and any structural elements. This will serve as your blueprint and help you visualize the final outcome.

Selecting Lighting Fixtures

Choose lighting fixtures that align with your design aesthetic and functional needs. Consider:

  • Pendant Lights: Offer a stylish and practical solution for general illumination.
  • Track Lighting: Provides flexibility to direct light towards specific areas.
  • String Lights: Create a festive and cozy atmosphere with a touch of whimsy.
  • LED Strip Lights: Offer energy efficiency and versatile installation options for accent lighting.

Planning Electrical Wiring

Determine the electrical wiring requirements for your lighting system. This may involve:

  • Running new wiring: If existing outlets are insufficient.
  • Installing a dedicated circuit: To ensure adequate power for your lighting fixtures.

Obtaining Permits

Check with your local building department to determine if permits are required for your grill gazebo construction. This may vary depending on the size, complexity, and location of the structure.

Building the Grill Gazebo

Once you have your design and plans in place, it's time to begin construction. This involves:

Foundation and Framing

Create a sturdy foundation using concrete piers, pavers, or a wooden platform. Construct the frame using pressure-treated lumber or aluminum for longevity and stability.

Roofing and Siding

Choose a roof material that suits your design and climate. Options include shingles, metal roofing, or fabric covers. Install the siding to enclose the structure and provide protection from the elements.

Installing Electrical Wiring

Carefully run electrical wiring for your lighting fixtures, ensuring proper grounding and adhering to all electrical codes. Consult a licensed electrician if you're unsure about any aspect of the process.

Adding Custom Lighting

Mount your chosen lighting fixtures securely, taking care to position them strategically to achieve your desired illumination effects. Consider:

  • Pendant lights: Hang them from the ceiling to provide general illumination.
  • Track lighting: Install it on the walls or ceiling for flexible light direction.
  • String lights: Drape them across the roof or along the perimeter for a warm glow.
  • LED strip lights: Mount them underneath the eaves, on the posts, or even within the framing for accent lighting.

Finishing Touches

Complete the gazebo by adding finishing touches such as:

  • Outdoor furniture: Create a comfortable seating area for relaxation and entertaining.
  • Decorative accents: Incorporate elements that reflect your personal style and enhance the ambiance.
  • Landscaping: Enhance the surrounding area with plants, flowers, or other landscaping features.

Safety Considerations

Ensuring the safety of your grill gazebo is paramount. Follow these guidelines:

  • Electrical safety: Ensure all electrical connections are properly grounded and protected from moisture.
  • Fire safety: Keep a fire extinguisher readily accessible and maintain a clear area around the grill. Install smoke detectors for added protection.
  • Structural stability: Regularly inspect the gazebo for signs of wear and tear, and make necessary repairs promptly.

Conclusion

By following these comprehensive steps, you can design and build a stunning grill gazebo with custom lighting that will elevate your outdoor living experience. Remember to plan meticulously, prioritize safety, and personalize the design to reflect your unique style and preferences. Your custom grill gazebo will become a cherished gathering place for memorable evenings and enjoyable outdoor gatherings.

Read More..

How to make a large wooden clock with a rustic finish

How to make a large wooden clock with a rustic finish

Building a Rustic Wooden Clock: A Step-by-Step Guide

Imagine a large, rustic wooden clock gracing your living room wall, its ticking a soothing rhythm against the backdrop of your cozy home. This timeless piece can add a touch of warmth and character to any space. In this guide, we'll walk you through the process of crafting a stunning rustic wooden clock, from choosing the right materials to applying the perfect distressed finish.

Gather Your Materials

Before you start, ensure you have all the necessary materials. This project requires a combination of woodworking skills and a creative touch:

  • Wood: Choose a sturdy hardwood like oak, walnut, or pine. Opt for reclaimed wood for an authentic rustic look.
  • Clock Mechanism: Select a high-quality clock mechanism that suits the size and style of your design.
  • Clock Hands: Choose hands that complement the overall aesthetic of your clock.
  • Wood Glue: Use a high-quality wood glue for secure bonding.
  • Wood Stain: Select a stain color that matches your desired rustic look. Walnut or mahogany stains are popular choices.
  • Wood Finish: Apply a protective finish like polyurethane or wax to seal and protect the wood.
  • Sandpaper: Use a variety of grits, starting with coarse and gradually moving to finer grits for a smooth finish.
  • Power Drill: Use a drill to create holes for the clock mechanism and hands.
  • Measuring Tape: Ensure precise measurements for accurate cuts and assembly.
  • Saw: Use a saw to cut the wood to your desired dimensions. A circular saw, table saw, or jigsaw are suitable options.
  • Clamps: Hold the pieces together securely while the glue dries.
  • Safety Gear: Always wear eye protection and a dust mask when working with wood.

Crafting the Clock Face

The heart of your rustic clock is the clock face. This section provides a detailed guide to constructing it:

Designing the Shape

Choose the desired shape for your clock face. A circular, square, or rectangular design can all work beautifully with a rustic aesthetic. Sketch your design on paper and determine the dimensions.

Cutting the Wood

Using your saw, carefully cut the wood to your specified dimensions. Make sure the cuts are clean and precise. For a circular clock face, you can use a compass or a router to create a perfect circle. If you're working with reclaimed wood, expect natural imperfections and variations in color and texture, which will enhance the rustic character of your clock.

Assembling the Clock Face

If your design involves multiple pieces of wood, carefully join them using wood glue. Clamp the pieces together firmly and allow the glue to dry completely before proceeding.

Installing the Clock Mechanism

The clock mechanism is the driving force behind your creation. Follow these steps to install it correctly:

Choosing the Right Mechanism

Select a clock mechanism that matches the size and style of your clock face. Consider the type of movementâ€"quartz for silent operation or mechanical for a more traditional ticking sound.

Marking the Center

Precisely mark the center of your clock face using a pencil and measuring tape. This is where you will attach the clock mechanism.

Drilling the Hole

Using a drill bit slightly smaller than the diameter of the clock mechanism's mounting hole, drill a hole through the center of your marked location. Make sure the hole is deep enough to securely accommodate the mechanism.

Attaching the Mechanism

Carefully attach the clock mechanism to the back of the clock face. Ensure it is centered and secure.

Attaching the Clock Hands

Once the clock mechanism is installed, it's time to add the hands that will bring your clock to life. Follow these steps:

Choosing Clock Hands

Select clock hands that complement the size and style of your clock face. Consider the length, material, and design of the hands to ensure a harmonious look.

Attaching the Hands

Most clock mechanisms come with instructions on how to attach the hands. Typically, this involves using small nuts or screws to secure the hands to the mechanism's axles. Ensure the hands are securely attached and aligned correctly.

Adding the Finishing Touches

Now it's time to give your rustic clock its final touch:

Sanding

Start by sanding the clock face with coarse sandpaper to smooth out any rough edges or imperfections. Gradually move to finer grit sandpaper to achieve a smooth and even finish. Sand the edges and corners to create a distressed look.

Applying the Stain

Choose a stain that complements the wood and your desired rustic aesthetic. Apply the stain evenly to the clock face, following the manufacturer's instructions. Allow the stain to dry completely before proceeding to the next step.

Finishing with Polyurethane or Wax

Apply a protective finish to the clock face to seal the wood and enhance its durability. Polyurethane offers a durable, water-resistant finish, while wax provides a more natural look. Choose the finish that best suits your needs and apply it evenly according to the manufacturer's instructions.

Distressing the Finish

To achieve a truly rustic look, distress the finish using sandpaper. Gently rub the edges and corners of the clock face to create a worn and aged appearance. You can also use a wire brush to create additional texture and distress. The degree of distressing is entirely up to your personal preference, so experiment until you achieve the desired look.

Hanging Your Rustic Clock

The final step is to hang your rustic clock in a prominent place where its beauty can be appreciated:

Selecting the Hanging Location

Choose a location that complements the clock's size and style. It could be above a fireplace, in a hallway, or on a large wall in your living room. Consider the lighting and background of the chosen spot to highlight the clock's rustic charm.

Installing the Hanging Hardware

Most clock mechanisms come with a hanger or bracket for easy installation. If not, you can purchase a suitable hanging hook or bracket from a hardware store. Ensure the hanging hardware is sturdy enough to support the weight of the clock.

Hanging the Clock

Carefully hang the clock on the wall, making sure it is securely attached and level. Once your rustic clock is in place, stand back and admire your creation! It's a unique and timeless piece that will become a treasured addition to your home.

Read More..